Airhead flip-handle fuel caps
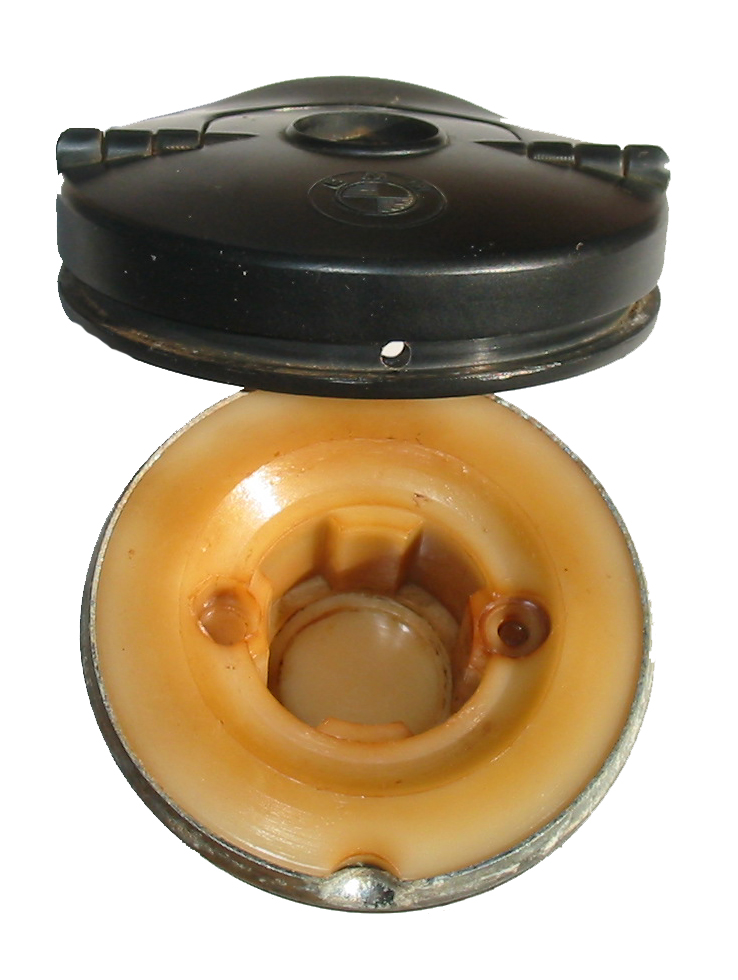
Internals
The rain skirt (which fits around the outside of the cover) is not shown.
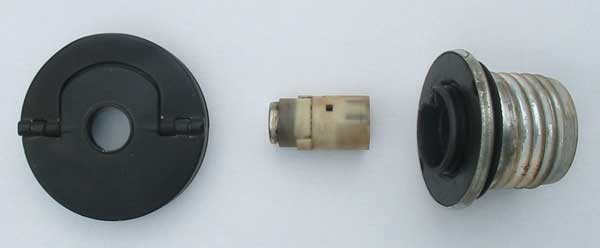
Starting with the /7 series, the hinged chrome filler cap of the /6 was replaced with a dark aluminum cap which was removable. It threaded into coarse threads in the filler neck, and had a flip-up handle. These are often referred to as the ratcheting caps, but they really get your attention when they become non-ratcheting. There's a bit of confusion over the ratcheting function. This article is based on a post-mortem of two caps (one early design, one later one) which would no longer open reliably. The early caps have an anodized finish and a BMW logo, while the later version is painted or powdercoated with no logo. Both caps have a replaceable plastic rain skirt which fits into a groove in the cover.
The cap assembly is comprised of the cover, lock cylinder and body. The body of the cap has a well in the center with four vertical grooves. The cover of the cap rotates freely on the body, and drives a lock cylinder that fits inside that well. The lock cylinder in turn pushes a pawl out to engage one of the grooves, locking the cover to the body. When you turn the key clockwise, the pawl retracts into the cylinder and will not engage the body at all.
Broken lock cylinders
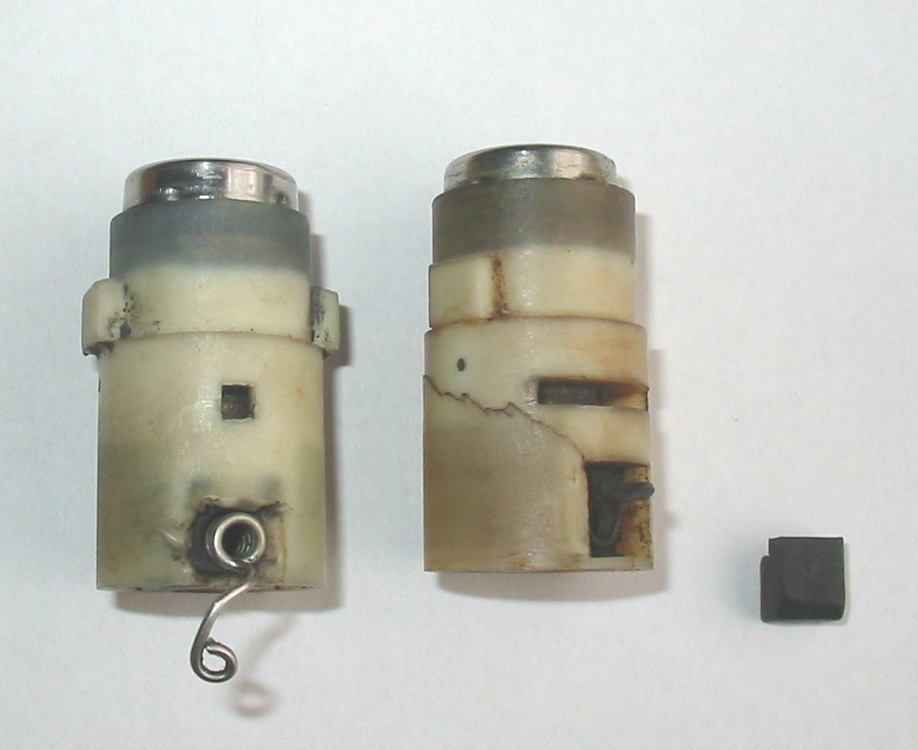
That pawl is beveled on one side, so that if you try to overtighten the cap it will ramp out of the groove and be pushed into the lock housing under spring pressure, to snap back out when the next groove comes around. The opposite side of the pawl is not beveled, so when you try to remove the cap it will engage the groove positively. At least, that's the theory.
The fatal flaw is the bottom of the lock cylinder (the pawl, spring and housing). When these fail, the pawl no longer engages the body and the cover spins uselessly. On the logo cap (right), the spring rusted and the pawl assembly seized. Continued use caused the lock housing to crack and the tip of the pawl to break off. On the newer cap (left), the spring did not corrode but it broke through the wall of the lock housing.
How do I remove it?
The simplest method is to drill a hole through the cover and into the body, then lock them together with a screw which enables the cap to be removed. Many people drill the cap and then continue to use it that way, and if you plan to replace the cap with a new one, there's no sense in trying to preserve the appearance of the old one anyway so drill away. If you want to reuse the cap and preserve the appearance of the cover, though, skip this section.
Drilling it
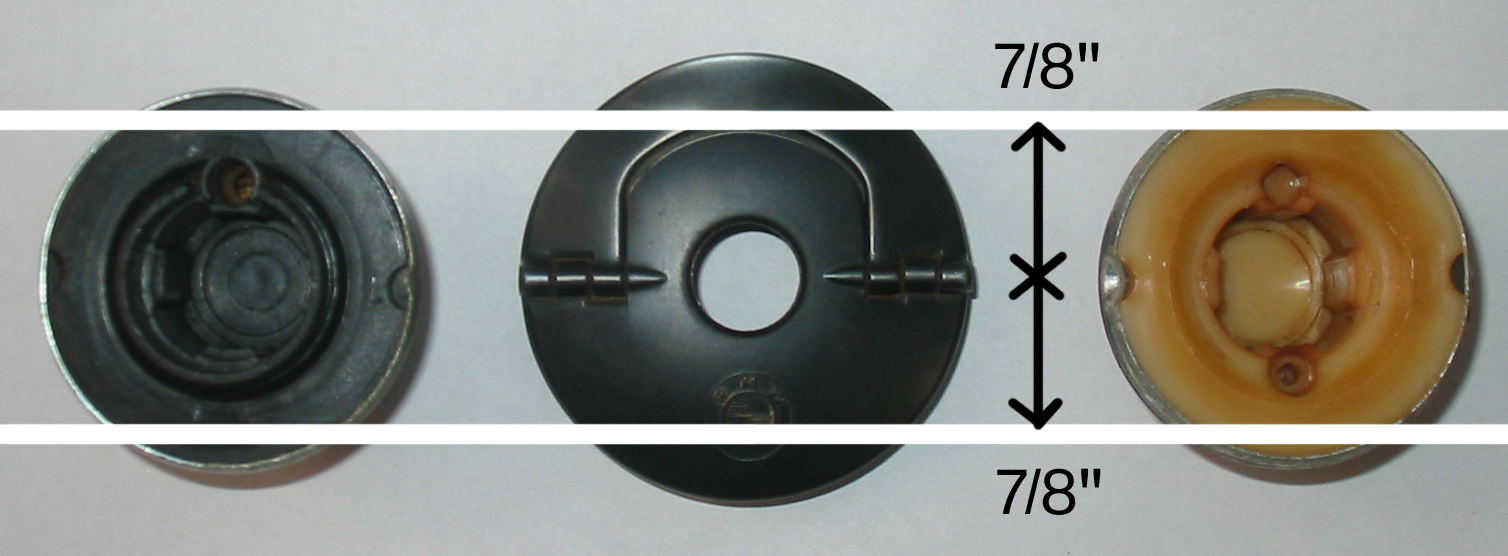
You'll be drillling a hole through the cover and into the plastic body so you can lock the two parts together. Drilling through the center of the logo will work, but you can also make a small hole opposite that where the handle will cover it up. Drill through the metal and into the plastic, then leave the drill bit in place and unscrew the cap. A 1/8" hole drilled 7/8" from the center of the cap will work well. This places the hole towards the outside of the logo or just past the step where the handle lies. Of course, the hole can be anywhere on that circle. Some people drill under the wide part of the handle and use a countersunk screw, so it is hidden.
Logo cap nondestructive removal
Grab the plastic skirt with a pair of pliers and slowly pull it sideways away from the cover. It will stretch and eventually the part you are pulling on will come clear of the cap. Lift and keep pulling so you can pull the plastic skirt completely away. In the groove that the skirt fit into, there are three holes: one is even with the logo and the others are 120 degrees apart.
Take a nail or stiff piece of wire (coat hanger wire would be fine) and bend an L at the tip about 1/2" long. Position the wire so the bent part is in one of the holes, then lift gently on the cover while you turn it. Keep pushing the wire inwards. At one point you may engage the dimple on the body and lock the two parts together; if this happens you will be able to unscrew the cap normally.
Plain cap nondestructive removal
The body has a ridge which snaps into a groove in the cover. You may be able to simply pull the cover off the body. There are many good ways to pull upward on the handle; I put a rope through it and looped it around my waist, then stood on the cylinders and pushed away from the tank. The cover popped off, but not until I was pulling quite hard on the it.
Note: Do not try this with the logo cap! The logo cap cover is held on with a rolled metal edge, and is very unlikely to pull free before the tank bends.
If you are pulling so hard that you are worried about damaging the tank, it's time to drill it, because the three holes are not present on this version.
Fixing it
You will probably find that the plastic lock cylinder housing has broken, so you're unlikely to effect any meaningful repair. Drill into the three holes in the logo cover (or drill similar holes in the plain cover) and stake the body with some sort of pins, or perhaps apply epoxy to hold the parts together. Keep in mind that you may have corrosion present and any holes you drill may admit more rainwater in the future.
If you are buying a new cap, you will probably want to transfer your lock to it. For the logo cap, the cover is held to the body by a lip that is crimped over during assembly. Use pliers to roll back the crimp and free the body. With the new cap, pry the body out of the cover if you haven't done do already. You will now be able to extract the plastic lock cylinder housing from the center of the body.
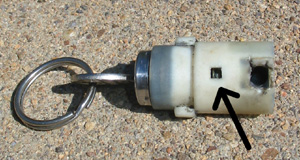
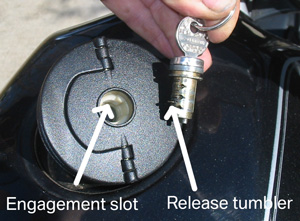
On the side of the lock cylinders you'll see a long slot and directly opposite it, a smaller opening. With the key in the lock, turn the lock inside the housing until you can see the release tumbler through the small opening. Push that in with a small screwdriver and withdraw the lock barrel. Clean and lubricate it, then insert it into your new cap assembly by aligning the release tumbler with the middle slot (with the engagement ramp) and pushing it in. You might need to turn the cap (yes, overtighten it slightly) to push the pawl back and allow the lock to drop fully into position.
Install the new plastic ring on the cap and you are finished. Keep water out of it and spray some lubricant in there periodically, and don't ratchet the thing!
Replacement caps:
The original cap might say "SHED 247" on the bottom if it is from a year when the SHED emissions components were used. Some people disable the SHED components; make your own choice.
| Standard cap, black | 51 25 2 307 125 | $107 |
|---|---|---|
| Cap with lock and key | 51 25 2 307 168 | $122 |
| SHED Cap, black | 51 25 2 307 140 | $166 |
| SHED cap, chrome | 51 25 2 316 185 | $197 |
| Plastic trim ring (not included with cap) | 16 11 2 307 360 | $3 |

