Autocom intercom integration
There are lots of good Autocom websites out there. Rather than try to duplicate the descriptions of others, I'll just stick to the experiences I've had with it and link to everone else's articles.
Rocket Moto is the US distributor.
Autocom Company, England has upgraded their site to provide much more detail on their products.
David Brick's experiences interfacing UHF radios to his Autocoms (a very methodical description of troubleshooting and design of a custom installation on two bikes)
Harry Greenspun had a relevant page which seems to be gone now
If you have a good Autocom page, please let me know.
The Autocom
Autocom has produced several models of intercoms, starting with the Pro 3000, adding the Eurocom, then the Easicom, and finally replacing the Pro3000 with the Pro M1. Most of this information was developed using my Pro 3000 and a friend's Eurocom, although I have been using a Pro.
Recently I've been using a Pro M1, which is functionally similar to the Pro 3000 but adds direct cell phone connectability, adjustable VOX, and the option for using direct 12V power. See my "Product Reviews" page for an evaluation.
General interfacing info
Interfacing an external audio source to the Autocom can be done either of two ways
- By plugging into the stereo jack. This is a 3.5mm stereo jack in the Autocom, and you can plug any typical mono or stereo input into this. The plug, being a stereo jack, has separate connectors for right and left channel, and plugging a mono connector into this can give flaky output on one or both channels. If you have a mono source (like an AM radio, CB, radar detector, etc) your best approach is to use a stereo plug on the Autocom end.
- By connecting to the transceiver jack. By tapping the speaker and ground pins, you can introduce any mono signal which will have the same priority as the stereo input.
Interfacing to a two-way radio can be a very difficult process. Purchasing the proper cable is a very viable option; if the correct one is made you will not save much money making your own once you factor your time into it. Besides, Autocom now distributes a wide variety of cables for different purposes. I started making my own because I wanted a PTT switch which Autocom didn't provide, and I also wanted to interface with radio which Autocom didn't support. So, if buying the correct cable isn't feasible, use the following information to help you in the design process.
Note: the Pro M1 also has a special jack just for cell phones. If your cell phone has a 2.5mm stereo jack, you can connect it directly to the Pro M1. It may be possible to interface another audio source using this socket but I have yet to experiment with it.
Auxilliary DIN plug pin configuration
Looking into the 60° DIN socket on the Autocom (or looking at the solder-side of a plug that you want to use with it) the pin configuration is:
8:00 white +9V (power from the Autocom)
10:00 yellow MIC (microphone)
12:00 shield GND (ground)
2:00 blue SPKR (speaker)
4:00 black or green PTT (push-to-talk)
Any mono signal can be applied to the GND+SPKR leads to get a second audio signal into the Autocom! This is very useful if you want to have a personal stereo and a radar detector connected at once. Connect the base of the stereo or mono plug to the GND pin and connect the tip (or tip and ring, for a stereo plug) to the SPKR pin of the DIN plug. This is a very useful cable to have in your kit!
Cell phone connection (Pro M1 only)
Cell phones commonly have a 2.5mm stereo jack on them, or provide an adapter to do so, since hands-free devices usually require this configuration. Autocom uses a 3.5mm jack (probably for mechanical strength) but offers a 2.5-to-3.5 cable. The connection is straight-through for each of the three (tip, ring, and base) contacts.
Headset plug configuration
Looking into the 90° DIN socket on the Autocom (or looking at the solder-side of a plug that you want to use with it) the pin configuration for the speakers seems to be:
9:00 mic
10:30 mic ground
12:00 ground
1:30 right speaker
3:00 left speaker
Note that the headsets are NOT the same from the Pro-3000 to the Pro-M1. The new headsets (common for the Eurocom, Easicom, and Pro-M1) will work with the Pro-3000 but won't work well. I haven't tried the Pro-3000 headset with the Pro-M1.
2-way radio interface
Radio output pin configuration
There are two types of connections from a radio: one with a separate PTT lead and one without. Most dash-mount CBs and other radios using DIN jacks for the microphones have a separate PTT pin. If you're lucky you will have all four of the signals you need in one place. My first CB had a speaker pin in the DIN jack, even though it was not used in the microphone and didn't show on the schematics.
Smaller radios (like HAM, FRS and handheld CBs) often don't have a PTT pin. Instead, the transmit circuit is activated by passing a very small current through the microphone pin. The signal from the Autocom's MIK pin isn't enough to trigger this, so you need to use a resistor to bleed some current from the mike pin to ground. Since that resistor will be in parallel with the microphone when you are transmitting, you want to use a large resistance so you don't sap too much power from the mike. I started out by copying a Radio Shack speaker/mike circuit that had a 100K resistor from MIC to GND (in series with a PTT switch) and 470pF capacitors from GND to SPKR and from GND to MIC.
Specific radio details
Radio Shack dash-mount CB
I had very good results with this one. The microphone DIN jack on the front had all four of the pins I needed (PTT, SPKR, MIC, and GND) even though there was no speaker in the mike. I made a straight-through cable and it worked well. I stopped using this radio when it burned out. :(
Looking into the pins (or looking at the solder side of the plug you are connecting to the radio) the pin-out is:
9:00 - ground
10:30 - mike
12:00 - <not used>
1:30 - spkr
3:00 - PTT
Additionally, you may encounter a 4-pin jack, with the pins in a square. The pin-out for this one is:
7:30 - ground
10:30 - mike
1:30 - spkr
4:30 - PTT
Cobra HH45WX handheld CB.
This is a VERY small radio. Signals come from a standard two-prong speaker/mike jack, which has a 2.5mm mono jack for the mike and a 3.5mm mono jack for the speaker. Use any of the circuits shown below for the cable, with a resistance of about 60~80K. The resistor can fit inside the DIN plug housing. Autocom sells the IL-9 cable for this radio and recommends this CB (if you must use a CB). My impressions so far is that it is weak in both reception and transmission but it may be a problem with my radio; others report very good performance from theirs.
Midland 75-784 handheld CB
This basically didn't work. It's a shame, because the radio gets very good reception. But they use a reverse-polarity microphone jack with some funny circuitry, and since the Autocom uses a common ground for the mike and speaker, there is a feedback problem. This is totally a Midland problem; this radio did the same thing with a Radio Shack speaker/mike that used a common ground but didn't do it with a RS earbud/throat mike that didn't have a common ground. Too much trouble; don't go with Midlanda for a CB unless you know it doesn't share this design problem.
Motorola Talkabout 280 FRS radio.
This was a special version of the regular Talkabout FRS. It takes a stereo 2.5mm plug, where the tip is SPKR, ring is MIC, and base is GND. Unfortunately, the way the housing is designed, standard 2.5mm stereo plugs will be too short. Motorola has a special plug that's about 1/8" longer, but you could modify the radio housing slightly and use a standard plug or else use an adapter. We modified a plug to fit the radio. Wiring was straightforward; we used circuit #2 with a 2.2K resistor and both radios worked properly with the Autocoms right away. There was some noise, and the PTT has a long delay before turning off. Still, overall performance was better than any of the CBs, mostly due to lack of RF noise. We only operated these radios on batteries.
Problems I encountered:
- Audio would cut out and radio would go into transmit when the speaker volume got too high. This was because the Autocom was set to "Music override" (Autocom refers to this as a "VOX bounce").It took a while to track this down but simply making sure the swich is set properly fixed it. Leave it set on "Music overlay" and this won't happen.
- CB noise. Big-time RF noise comes from the bike (and the bike picks it up because the CB works on the AM band). The fuel pump made a loud whine and the ignition and injectors buzzed. These noise sources force me to leave the squelch so high that I can only receive the strongest signals. I used a capacitor to stop the fuel pump noise, and I will work on the ignition next. The noise in NOT in the power lines; it is noticed even when the radio is running on batteries.
- Weak antenna. Some of this was due to the noise (it detracted from my ability to send and receive) but in addition I couldn't get a SWR better than about 2.2 with the rubber antenna or an external antenna using the HH45. I got below 2.0 with the original RS CB. I will be trying different antenna designs; one good one seems to be the Wilson NG4. More work is in the future on this front.
Cable designs:
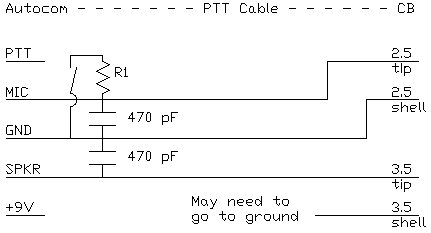 This is the same circuit that the Radio Shack 19-314 speaker/mike uses. R1 is 57K for the RS mike. The audio goes straight through, while the audio ground didn't need to be connected since it grounds through the power supply (you may need to ground it if you use batteries or even if you hardwire it). The mike signal goes straight through as well, but the mike pin (in the radio) needs to be dragged down a little bit electrically to trigger the transmit circuit in the radio. This is accomplished by the resistor and the PTT switch.
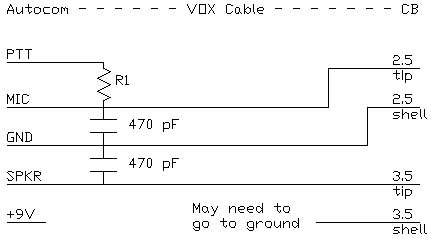 This cable uses VOX to operate the Cobra HH45WX CB. It is very closely based on the RS cable shown above. I changed the resistance; 100K didn't give a full transmit signal so I used a potentiometer set to about 80K. I wanted as high a resistance as possible so the mike signal was not absorbed.
 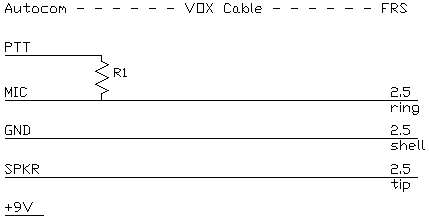 This cable uses VOX to operate the Motorola Talkabout 280 FRS radios. R1 was 2.2K and the radios worked pretty well. Capacitors could be used in the locations shown in the other schematics, but we didn't use them. R1 could possibly be changed for better VOX performance and possible microphone performance, but we haven't worked on that.
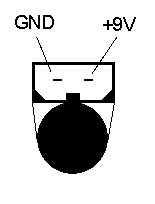 For use with the Kenwood radios, Autocom provides the IL-7 cable with the 2.5/3.5 connector. This cable has a 2-contact 2.5mm pin, representing GND and SPKR, and a 3-contact 3.5mm pin where base is PTT (exact circuitry is not known). Additionally there is a secondary connector bound to the middle of the cable, which provides 9V power from the Autocom, as shown here.
If your radio happens to require a 9V power supply, you could use this to power it (if you can find the right plug). Otherwise, a separate power circuit can be made (see "Motorcycle Electrics" for power supply info).
Closing poem
by Cary Stotland (sung to "Beverly Hillbillies" tune)
Come and listen to a story 'bout a rider named Jude,
A beemer ridin' fellow and a mighty crafty dude.
He was wantin' to be ridin and a'talkin' to his bride,
Whilst she was either on the back or pullin' up aside,
His beemer, that is...nice ride..kinda quiet like..
Well, then one day Jude was at the local store,
He saw a pair of radios just sittin' by the door.
He reckoned he could get 'em both and fix' em real good,
And make m' so his way of talkin' would be understood.
High speed Beemer ridin' talk...kinda noisy like...
Jude checked the manuals out and found that they could VOX,
he knew he'd mess around with them when they came out of the box.
Thought a bit and sure enough he figured what to do
He'd use the push-to-talk switch when the VOX became do-do.
Crappy-like....all garbled and such.
Now ole' Jude is happy as a lark.
He and his bride can talk while ridin or while parked.
All it took was findin him the right mentality
to get a pair of radios and some ingenuity.
Right-smart thinkin'...work it out yerself...don't be a turkey and buy all
that high-dollar, yuppie-lookin stuff...be crafty,
Y'all ride safely, ya hear?

