Valeo starter overhaul
This page is being overhauled, and will show the weaknesses in the Valeo starters and the fixes for them.
Valeo D6RA starters were used in production starting with the 1988 R100GS, and starting in 1989 all of the boxer models had them. They are much lighter than the Bosch starters and draw less current. The Valeo became the replacement part for all Aiheads, with a different model introduced to replace the early 8-tooth Bosch starters. Here are the models involved:
- Airheads through 1974: D6RA94 12 41 1 357 500
- Airheads 1975-on: D6RA7 -> D66RA15, 12 41 9 062 425
- Oilheads: D6RA55 -> D6RA75 12 41 2 306 700
However, they are not trouble-free. Three common issues are:
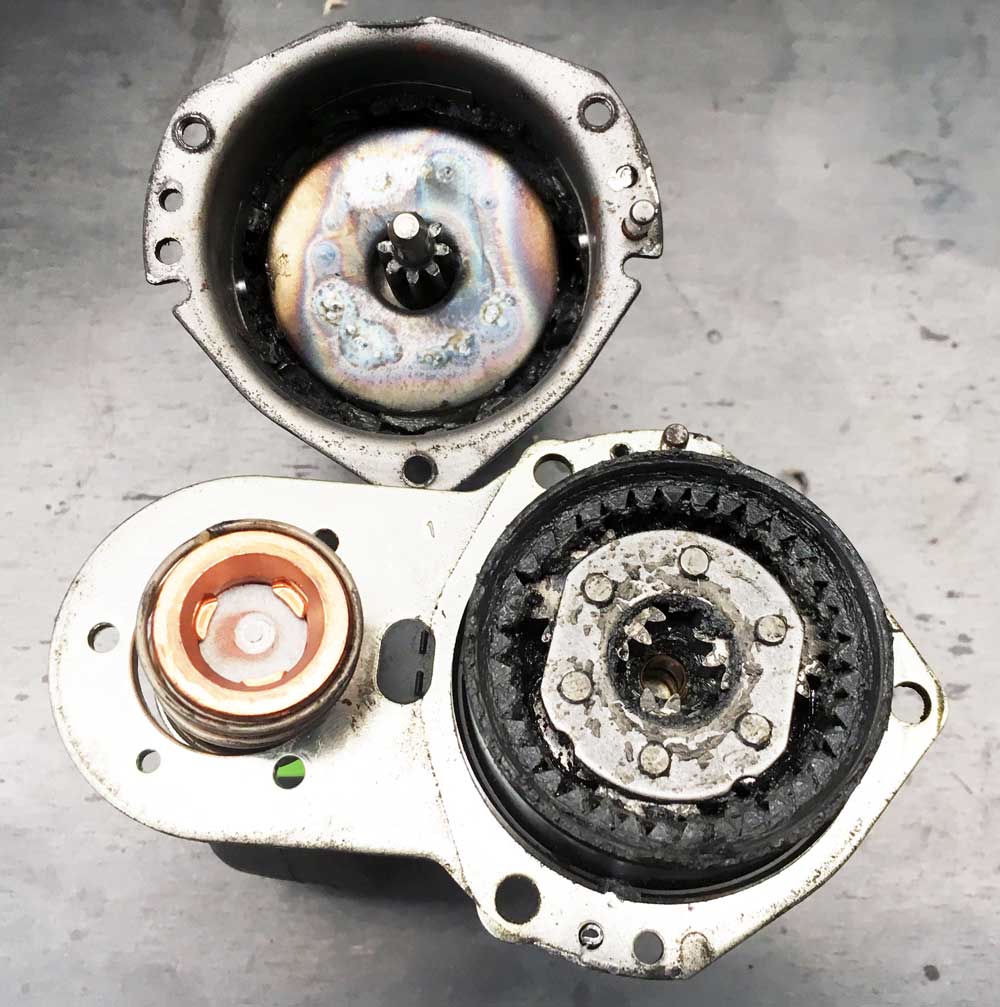
1) The internals simply dry out and crud up. The nose bushing gets worn, the lubrication at the bendix and at the rear armature bushing dries up and becomes sticky, the solenoid plunger gets dirty, the planetary gear lube dries up, etc.You need to disasemble, clean and grease the whole unit.

2) The permanent magnets in the magnet housing (the outer starter motor housing) detach from the wall, move around, and jam the armature. This problem can happen on any of the Airhead or Oihead starters up to 2002. At that point the model numbers changed (D6RA7 became D6RA15, D6RA55 became D6RA75) and the magnets were held in place by clips and possibly a better adhesive. This cured the problem, but fifteen years' worth of motorcycles were out there with starters that did not have this improvement. New replacement Valeo starters, and new magnet housings, have the fix. You need to replace the starter or the magnet housing.
3) The shield for the planetary gears can be dislodged and will then short out the armature. The shield can be repositioned but the armature may be damaged. Some armatures have a cap over the end of the armature but the one pictured doesn't. You may be able to repair this without replacing any parts, but the armature may be damaged by excess current draw.

Old content below:
======================
If your Valeo starter makes a screeching run-on noise after starting the engine, it needs to be cleaned and greased. Other symptoms of starter trouble vary, but inevitably the starter needs to be pulled apart for cleaning and inspection. If your starter has an electrical fault (not working, intermittent operation, etc), read Greg's article linked at the bottom of the page. If your starter has loosened magnets, read Alex's article or just buy a new magnet housing. Contrary to what I've read on the web, I don't think the squealing problem is caused by the planetary gears as much as by the solenoid mechanism (plunger and pinion splines).
For reference, here are the internal parts, names used, and replacement availablity from BMW for the D6RA15 starter used on Airheads. BMW does not list any repair parts for the D6RA55/D6RA75 starter used on the Oilheads, but the brush sets and repair kit #4 will work. Differences are listed at the bottom of this page. At the time of writing this, replacement pinions, brushes, solenoids, etc. were available from BMW. Pinions and solenoids were about $120, and brushes were $10 to $20 depending on which kit you need.
 |
1. Solenoid switch, 12 41 1 244 607
2.Clutch fork lever, 12 41 1 244 609 3. Starter pinion, 12 41 1 244 682 4. Repair kit, 12 41 1 244 611 5. Carbon brush set, 12 41 1 244 684 6. Spring washer, 12 41 1 244 623 7. Hex nut, 12 41 1 244 622 8. Repair kit screws, 12 41 1 244 613 9. Carbon brush set, 12 41 1 244 685 |
Tools needed:
- Torx T25 or 4mm allen for removing the three motor housing bolts
- Torx T20 for removing the solenoid switch
- 13mm wrench for removing the solenoid lead
- 8mm wrench for removing the brush assembly
Basic disassembly process
 |
Remove the nut and washer holding the brush cable to the solenoid body.
Remove the three bolts holding the motor housing to the nose casting, and remove the T20 bolt holding the solenoid to the casting. The nose casting can be pulled away, and the motor body can be pulled away as well, leaving three basic parts: the casting, the motor body, and the steel plate frame. Note: there are weak rivets also holding the motor housing to the plate, but pry them apart and discard them. Remove the remaining two T20 bolts so you can pull the solenoid switch and spring off. At this point you can slide the pinion towards the end of the shaft and remove pin holding the fork and plunger in place (it will probably fall out). Clean the plunger and the inside of the solenoid switch body. |
 |
If you are just trying to stop a "run-on squeal" you may not need further disassembly. By cleaning out the curved splines between the pinion and the starter shaft, and cleaning the solenoid plunger you can restore free operation. Be sure to flush with plenty of solvent and blow dry with compressed air. You may want to lube with a VERY thin coat of a moly-based grease, such as CV joint grease. By removing the large circlip and prying the cover from the planetary gear housing, you can slide the gears out a bit in order to clean them better. Flush the gears with solvent and brush away all of the old grease that you can reach. Pack the gear housing with fresh grease (you don't need to use a lot), slide the shaft through, push the cover into place and reapply the large circlip. |
Disassembling the starter shaft
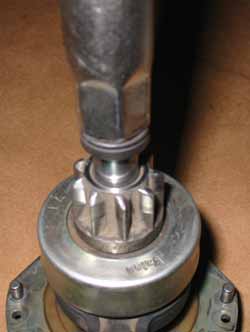 |
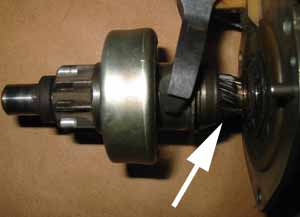
If you want better access to the planetary gears or the pinion splines, you will need to remove the thrust ring from the end of the starter shaft as follows: With a socket or equivalent, drive the outer ring down from its internal snap ring towards the pinion. In this picture I am using an item from a BMW toolkit to push it down. Pry the snap ring away GENTLY (you may need to reuse it) and slide the thrust ring and pinion off the shaft. Remove the large external circlip from the base of the starter shaft, and slide the shaft out through the planetary gearbox. Reassembly is difficult at this point! After putting the retainer and the snap ring back on the shaft, you will need to push down HARD on the retainer and simultaneously squeeze the snap ring under it. The retainer and snap ring are partof the rebuild kit listed by BMW, but in truth I see very little advantage in removing these parts at all, because you can clean the parts well enough without it. The remaining disassembly you can do is removing the brushes. I found this to be somewhat tedious and the brush holder assembly is fragile. By removing the two nuts on the end of the motor, you can pull the cover off and inspect the brushes and contacts. If you have had no problems, and the contacts and brushes look OK, I absolutely would not go any farther. If the contacts look badly arc-damaged you will need to carefully remove the spring to get the end cap off. You can replace the brushes without removing the spring. |
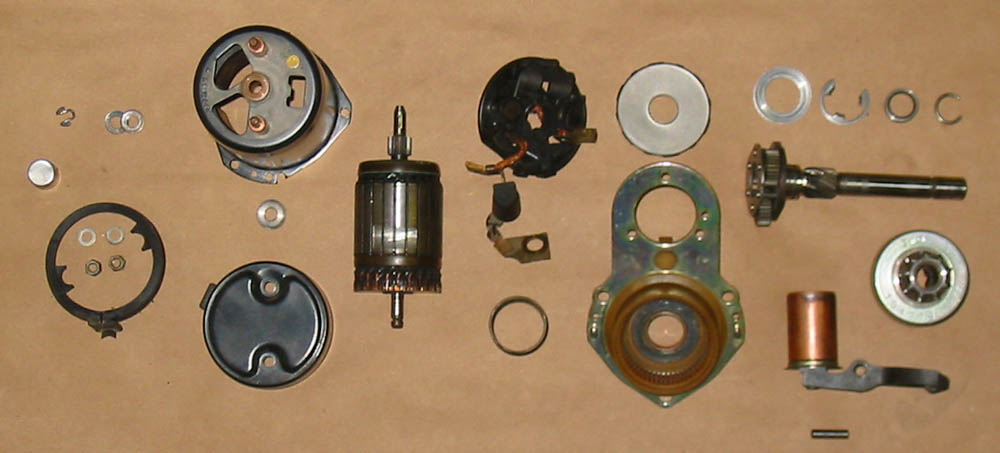 |
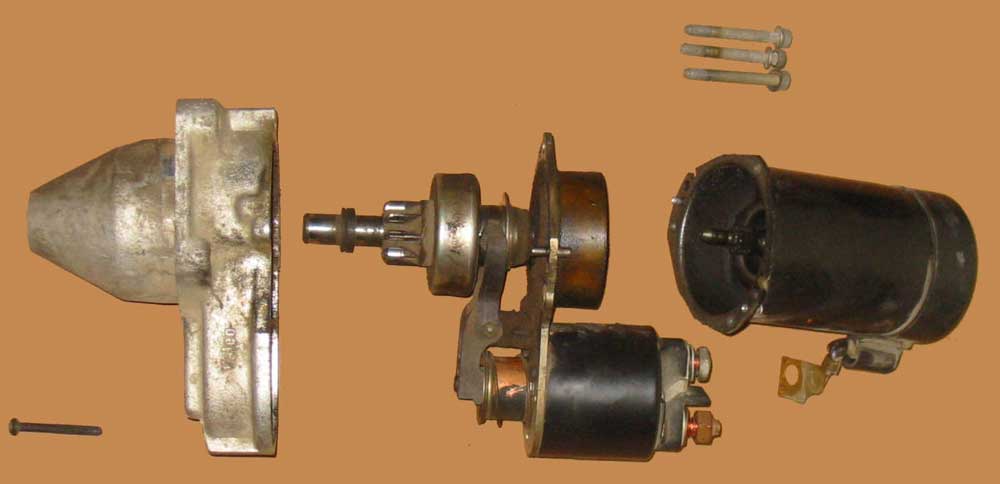
If you do a total disassembly of the starter, this is what you are likely to end up with (the solenoid body and nose casting are not shown here for some unknown reason).
Some people prefer the Bosch starter instead. The Valeo is much lighter; about 2.8kg instead of 4.5 for the Bosch. |
Differences between D6RA7/15 and D6RA55
Although the starters are very similar in construction, they turn in different directions and have different reduction gears. So, basically all of the main parts (magnet housing, commutator, bendix, planetaries, nose casting) are different. However, the main tune-up parts (brush holder, brushes, nose bushings) are the same. Euromotoelectrics sells them as a kit.
Replacement
The D6RA15 may also be known as 432586.
One source is Ace Houston Warehouse. Contact Bob Spencer, 800-392-3332 acehoutx@flash.net and be sure to quote the Airheads Club account #700 to get the discount.
Parts not available from the dealer might be available from Euro Moto Electrics in Colorado. Euro Moto carries new magnet housings, which are not available from BMW.
Other Valeo Starter repair links that I referred to for this:
Greg Feneis' article on the Airheads site (no longer publicly available) concentrates on electrical problems
Joerg Hau's R80GS page concentrates on the swapping magnet housings
On Alex's page look under "Technical Stuff" and there are some photo galleries showing these starters and their problems.

